Ceiling Leak Water Damage in Studio City
A changing ceiling calls for attention to what is above the finish. Ceiling leak cleanup in Studio City traces the source, assesses damaged material and creates a drying plan for the affected cavity.
(888) 578-6508 Discuss the overhead moisture change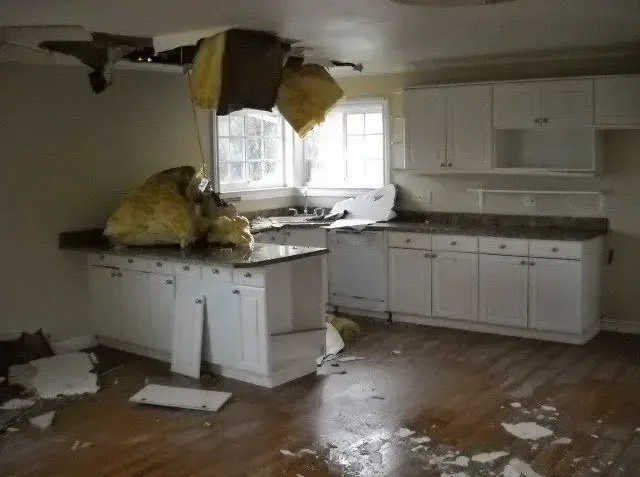
A ceiling that develops a new stain, soft patch or bulge needs more than a cosmetic response. Water may be collecting above the visible finish or moving along a concealed surface. The assessment starts with the condition of the room below, then identifies a safe way to inspect the source and the materials that have absorbed water overhead.
First steps for ceiling leak water damage
- Clear the area below. Keep people away from a sagging or bulging section and avoid moving heavy belongings through the space beneath visibly weakened overhead material.
- Report electrical contact. Describe water near ceiling lights or other electrical fixtures and avoid operating affected equipment until the electrical condition has been addressed safely.
- Note the timing. Record whether the stain grows during rainfall, fixture use or another activity so the source inspection begins with useful observations about the leak.
- Identify available access. Mention an attic opening or other safe access above the room, without entering a wet cavity or disturbing overhead material before inspection.
How ceiling leak water damage progresses
- 1
Assess overhead condition
The inspection identifies changes in ceiling shape, visible water and potential hazards in the room below before selecting a safe route to the affected assembly.
- 2
Locate the water path
Accessible areas above and around the stain are examined to connect the visible symptom with its source and define the extent of moisture within adjoining materials.
- 3
Open and dry selectively
Damaged finishes or wet insulation are addressed where necessary, and retained framing or ceiling materials receive a drying arrangement suited to the access and assembly present.
- 4
Document closure readiness
Readings and material condition are recorded before repair begins, with the source correction and any remaining work clearly identified for the next stage of ceiling restoration.
Let the symptoms direct the source inspection
For a property near Moorpark Street, useful details include when the mark appeared and whether it changes during fixture use or rainfall. These observations help direct inspection of accessible areas above the room. The source still needs to be located at the property, with the ceiling assembly checked for moisture beyond the most discolored portion of its visible surface.
Rye Street is the location of Studio City Recreation Center, while Silver Triangle is a named local area. When arranging service nearby, describe the affected room and any available access above it. The cleanup plan follows those building details, including whether the ceiling is stable enough for inspection from below.
- Keep furniture movement and foot traffic away from ceiling areas that have sagged or changed shape since water appeared.
- Record the outline of visible staining from a safe position before access work removes part of the affected finish.
- Mention wet walls, light fixtures or trim nearby because those changes may show where water traveled beyond the ceiling patch.
- Avoid puncturing a bulge or removing overhead material before the water, electrical exposure and finish condition have been assessed.
Choose access around the wet assembly
Selective opening can provide access to saturated material and reveal the condition of framing or insulation. The inspection should explain which finishes have lost integrity and which can remain for drying. The opening needed for a source repair may not expose every wet section, so moisture checks around the cavity help determine whether additional access has a practical purpose.
- Remove unstable or unsuitable material with a plan for protecting the room and contents beneath the affected ceiling.
- Inspect adjoining cavity sections where water may have followed framing before emerging at the first visible stain.
- Coordinate roof leak cleanup when inspection connects the ceiling moisture with rain entering through the roof assembly.
- Track retained moisture after source correction so the remaining ceiling materials are ready before the cavity is enclosed.
Make repair readiness more than a visual decision
A dry looking surface can still cover damp insulation or wood. Repeated measurements at relevant locations help explain whether drying is working and whether access needs to change. The finish repair should follow that record, with outstanding plumbing or roof work identified so the owner understands the sequence from source correction to final decoration.
The cleanup scope should distinguish opening, removal, drying and replacement. Keeping those tasks clear makes a changed ceiling easier to manage and avoids treating a fresh coat of paint as the endpoint of a water loss.
Discuss the wet materials before repairs
A stain that spreads or a ceiling that changes shape needs an assessment of the layers above it. Describe the symptoms and their timing to arrange the next cleanup steps.
(888) 578-6508 Arrange a ceiling condition assessmentWhat does ceiling leak water damage cost in Studio City, CA?
Ceiling leak water damage costs in Studio City reflect the affected bays, material condition and access above the room. The planning ranges increase as cleanup moves from a localized damp area to broader concealed spread.
Localized stain and moisture
$900 to $1,600
- Small area
- Focused checks
- Limited access
Open ceiling cavity
$1,600 to $2,800
- Material removal
- Exposed framing
- Targeted drying
Several bays or rooms
$2,800 to $4,200
- Wider spread
- Multiple openings
- Expanded setup
The figures describe typical work scopes, not a quote. Water category, affected area, access and the time before drying change the scope. Compare the inputs in the water damage cost calculator.
Documentation for your insurance claim
The restoration contractor records the water source, affected rooms and moisture readings before removal begins. Timestamped photographs show damaged materials and the reason for opening a wall or lifting a floor. Daily temperature, humidity and material readings document progress against a dry comparison area. An itemized scope separates extraction, disposal, cleaning and equipment use from plumbing repairs and finish replacement. The property owner keeps invoices and the initial discovery details with that record. An insurer evaluates coverage under the actual policy; a sudden plumbing release, outside flooding and a sewer backup can receive different treatment. The adjuster decides coverage, and the homeowner checks deductibles, exclusions and any applicable endorsements directly with the insurer.
Daily measurements support the IICRC S500 drying goal. The drying crew compares similar materials and investigates readings that stop improving before equipment leaves.
Ceiling leak water damage in Studio City
Ceiling damage assessments serve Studio City properties around Moorpark Street, Rye Street and Silver Triangle, with access planned for the actual building layout and condition of the overhead finish.
The same service nearby: ceiling leak water damage in Valley Village, North Hollywood, Sherman Oaks.
All water damage services in Studio City · View all service areas
Ceiling Leak Water Damage questions in Studio City, CA
Should a bulging ceiling be punctured to drain it?
An unassessed bulge can involve weakened material, hidden electrical components or water that releases unpredictably. Keep the area beneath it clear and describe the change when arranging help. The access method should be selected after the overhead condition and related hazards have been evaluated.
Can a ceiling leak come from somewhere besides the roof?
Plumbing or water traveling through another building assembly can also produce a ceiling stain. Observations about timing can help direct the inspection, but the source needs to be traced at the property. The repair and drying scope should follow that identified route through the affected materials.
Why inspect outside the stained patch?
The stain shows where water affected the visible finish, while moisture may extend farther along framing or concealed layers. Checking surrounding areas helps define the actual work boundary. That assessment prevents closing a small repaired patch while a neighboring part of the cavity remains wet.
Does every stained ceiling require full replacement?
Replacement depends on material damage, moisture extent and access requirements. Some portions may remain suitable for drying, while softened, detached or otherwise unsuitable sections need removal. The inspection should explain those distinctions and identify the practical reason for each opening proposed in the affected room.
When can furniture return beneath the affected ceiling?
The room should first be assessed for overhead stability and the work area marked out. Furniture placement also needs to allow access and drying equipment operation. The cleanup plan should explain when the space below can be used safely and what must remain clear during the work.
What should happen before the ceiling is closed again?
The source needs correction and retained materials need an appropriate drying endpoint. The work record should identify moisture checks, removal and outstanding repairs. Closure should follow that information so new finishes do not hide damp insulation, framing or other material still requiring treatment above the room.
A clear scope starts with the source
A stain that spreads or a ceiling that changes shape needs an assessment of the layers above it. Describe the symptoms and their timing to arrange the next cleanup steps.
(888) 578-6508 Arrange a ceiling condition assessmentUnderstand what is happening above the finish
Source tracing and moisture checks define access, drying and the handoff to ceiling repairs.
(888) 578-6508 Discuss overhead drying access